Pad Printing Machine for Plastic Parts Manufacturer Guide
Whether you are producing automotive dashboard components, medical devices, or consumer electronics, mastering the art of marking and decorating plastic is crucial. Welcome to the comprehensive Pad Printing Machine for Plastic Parts Manufacturer Guide.
When it comes to decorating 3D objects, a pad printing machine stands out as one of the most versatile and efficient solutions available. However, navigating the complexities of equipment, ink adhesion, and automation can be daunting. This guide will walk you through everything you need to know about setting up, optimizing, and scaling your printing on plastic processes, ensuring high-quality, durable results every single time.
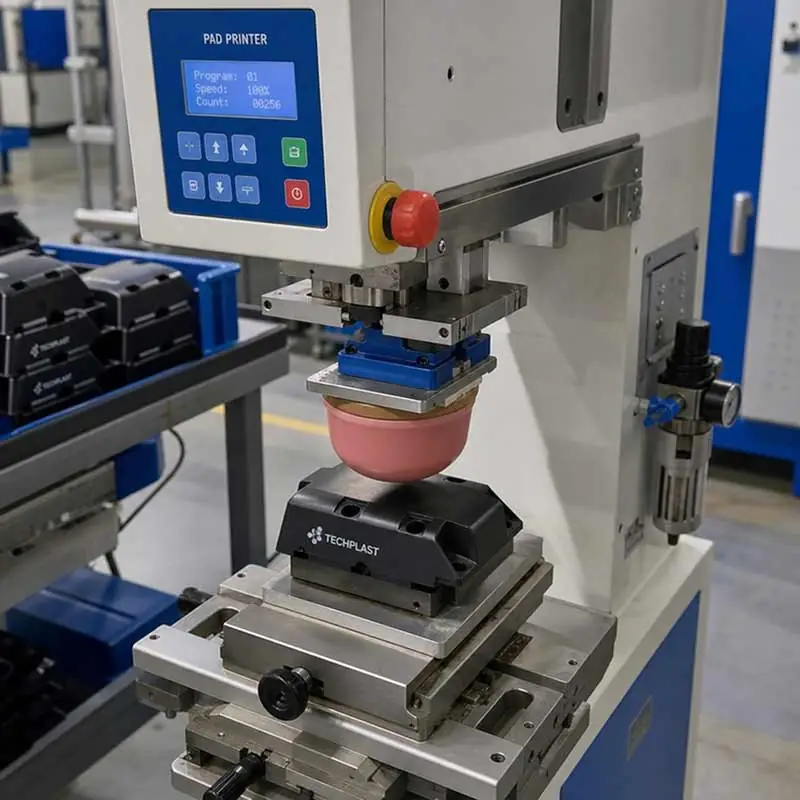
Table of Contents
Understanding the Fundamentals of Pad Printing on Plastics
At its core, a pad printing machine operates like a highly sophisticated rubber stamp. An etched plate (the cliché) holds the ink in the desired pattern. A soft silicone pad presses onto this plate, picks up the ink, and transfers it onto the plastic substrate. Because the pad is flexible, it conforms easily to irregular, curved, or textured surfaces.
Pad Printing vs Screen Printing for Plastic Parts
One of the most common questions manufacturers ask is how to choose between pad printing vs screen printing for plastic parts.
Screen Printing: Ideal for flat, large surfaces that require a thick layer of ink and high opacity.
Pad Printing: The undisputed champion for 3D parts. If your plastic component has complex curves, recessed areas, convex shapes, or tiny intricate details, a pad printing machine for plastic parts is the only logical choice. It offers unparalleled flexibility that rigid screens simply cannot match.
Selecting the Right Equipment for Your Production Floor
Investing in industrial pad printing equipment for plastic components requires a deep understanding of your production volume, part complexity, and facility environment.
Closed Cup vs Open Inkwell Systems for Solvent-Based Inks
When comparing closed cup vs open inkwell systems for solvent-based inks, the modern industry standard leans heavily toward closed cup designs.
Closed Cup Systems: These feature an inverted cup that holds the ink and acts as a doctor blade. They trap solvents inside, preventing rapid evaporation. This keeps ink viscosity stable, reduces fumes, and cuts down on ink waste.
Open Inkwell Systems: In these older models, the ink sits in an open trough. While they allow for larger print areas, they require constant monitoring of ink viscosity due to solvent evaporation, making them less efficient for modern, fast-paced production.
Scaling Up: Automation and Rotary Integrations
As your business grows, manual machines will no longer suffice. Upgrading to automated pad printing systems for high volume manufacturing allows you to maintain strict quality control while drastically increasing output.
For products requiring multiple logos, warnings, or colorful graphics, multi-color pad printers with rotary table integration are game-changers. A rotary index table moves the plastic parts continuously through different printing stations. This allows multiple colors to be laid down in a single cycle, ensuring perfect registration and maximizing throughput.

Crucial Components: Pads, Plates, and Inks
The success of your print relies heavily on the holy trinity of pad printing: the silicone pad, the cliché (plate), and the ink.
Silicone Pads and Steel Plates
Perfecting your image transfer requires careful silicone transfer pad selection for curved surfaces. Silicone pads come in varying shapes (round, rectangular, or loaf-shaped) and durometers (hardness).
Hard Pads: Best for flat surfaces and highly detailed prints.
Soft Pads: Essential for fragile items or sharply curved plastic parts, as they wrap around the contours without distorting the image.
Equally important is the quality of your plate. For short runs, photopolymer plates are cost-effective. However, for high-volume jobs, investing in custom clichés and steel plates for precision marking is highly recommended. Thick steel plates can withstand over a million impressions, ensuring crisp, consistent logos on every part.
Navigating Ink Selection
Ink formulation dictates the longevity of your print. For consumer electronics and automotive parts, prioritizing industrial grade printing ink durability and chemical resistance is non-negotiable. These inks are formulated to withstand UV exposure, harsh cleaning chemicals, and constant abrasion.
The medical industry, however, has stricter standards. Knowing how to choose pad printing ink for medical grade plastics is critical. Medical inks must be biocompatible, typically passing stringent USP Class VI or ISO 10993 certifications. They must also survive sterilization processes like autoclaving, gamma radiation, or ethylene oxide gas without fading or leaching.
Mastering Surface Preparation and Adhesion
Plastics can be notoriously difficult to print on. Getting ink to stick requires proper preparation, especially when dealing with synthetic polymers.
Preparing the Substrate
Preparing injection molded parts for the pad printing process is your first line of defense against poor ink adhesion. Injection molding often relies on mold release agents—silicone or wax-based sprays that help the plastic eject from the mold. If these residues are left on the plastic, the ink will sit on top of the grease and easily rub off. Thoroughly cleaning parts with isopropyl alcohol or industrial degreasers is a mandatory first step.
Tackling Low Surface Energy
Certain plastics, such as Polypropylene (PP) and Polyethylene (PE), act like Teflon; liquids naturally bead up and roll off them. This makes improving ink adhesion on low surface energy plastics a major challenge for manufacturers.
To solve this, the surface tension (measured in dynes) must be increased so the ink can properly wet out and bond. Using corona treatment for plastic surface preparation before printing is one of the most effective methods. A corona treater discharges a high-frequency electrical plasma onto the plastic, oxidizing the surface and creating microscopic anchor points. Flame treatment and chemical primers are alternative methods, but corona treatment is often preferred for its safety and ease of integration into automated lines.
Process Optimization and Troubleshooting
Even with the best preparation, issues can arise on the production floor. Knowing how to solve them quickly saves time and money.
Troubleshooting Common Defects
If you are experiencing quality issues, here is a quick guide to troubleshooting common pad printing defects on molded parts:
Pinholing (tiny dots missing in the print): Usually caused by trapped air or static electricity. Solution: Use an anti-static blower or slow down the pad compression speed to let air escape.
Webbing or Stringing (ink pulling like spider webs): The ink is too thick or drying too fast. Solution: Add a small amount of retarder or solvent to adjust the viscosity.
Distorted Images: The pad is either too soft for the application, or you are pressing down too hard. Solution: Switch to a harder silicone pad or reduce the downward stroke pressure.
Boosting Production Efficiency
When margins are tight, optimizing pad printing cycle time for mass production becomes your top priority. You can achieve faster cycles by:
Minimizing Pad Stroke: Adjust the machine so the pad only travels the exact distance necessary. Even a fraction of an inch saved per stroke adds up over tens of thousands of parts.
Inline Drying: Integrate hot air blowers or infrared (IR) drying tunnels right after the print station so parts can be packed immediately without smudging.
Quick-Change Systems: Utilize magnetic plate holders and tool-less cup removal to reduce downtime during color or artwork changeovers.

Budgeting: What to Expect
A common question from startups and mid-sized manufacturers is: how much does a pad printing machine cost for small businesses?
The answer depends heavily on your production needs.
Entry-Level/Manual Machines: Small, manual, single-color tabletop machines can range from $1,000 to $3,000. These are excellent for prototyping or very low-volume runs.
Semi-Automatic/Single Color: High-quality, pneumatic, or electric single-color machines typically range from $4,000 to $8,000.
Automated/Multi-Color Systems: For automated, multi-color machines featuring programmable logic controllers (PLCs), rotary tables, and automatic pad cleaning, expect to invest anywhere from $15,000 to over $50,000.
While the upfront cost of automated equipment is higher, the massive reduction in labor costs and the decrease in scrap rates often result in a rapid return on investment.
Conclusion
Successfully decorating plastic parts is a blend of chemistry, mechanics, and precision. By understanding the capabilities of your equipment, properly matching your silicone pads and clichés, and ensuring meticulous surface preparation, you can achieve flawless, durable prints on even the most complex substrates.
Whether you are printing vital safety information on a medical device or a colorful logo on a consumer product, referencing this Pad Printing Machine for Plastic Parts Manufacturer Guide will help you make informed decisions, optimize your workflow, and elevate the overall quality of your manufactured components. Choose the right machinery, prep your surfaces diligently, and watch your production efficiency soar.